Adding a New Proposal
1. New Proposal
Click "New Proposal" on the right side of the screen:

2. Select a Proposal Site
Select the site you would like to link the proposal to from the dropdown box and click "Ok". This step is only applicable if this customer has more than one site.

3. Fill out Proposal Fields
Fill out the fields on the "New Proposal" page that appears.

Status
Select the proposal's status from the dropdown box. The only status that will turn a proposal into a work order is the "Sold" status. If you aren't sure what status to select, skip this section for now (it will be addressed again the the "Complete a Proposal" section).
PO Number
Enter the purchase order number if applicable.
Proposal Date
Enter the date the proposal was created.
Contact
Enter the prospect's contact name.
Enter prospect's email address.
Follow Up
Day to follow up with the prospect. This appears on the calender.
Est Closing
When you expect to close the deal.
Est Closing %
How strongly you feel about closing the deal. The higher percent, the more likely the proposal will be sold.
Source
How the prospect discovered your company. This is a required field.
Site
Select the site you would like to link the proposal with from the dropdown.
System
If this proposal is linked with an existing system, select that system from the dropdown box. If this proposal is for a new system click the "+ System" button to the right of the dropdown box (system information can be entered at a later time), fill out the fields in the "New System" page that appears, and click "Save" in the upper right hand corner of the page.
System Type
Select the system type from the dropdown box.
Sales Tax
The sales tax rate will auto-fill based on the site you selected but you can edit this using the dropdown box.
Terms
When the payment for this proposal would be due relative to the invoice date.
Service level
Select the service level you will be assigning to the system from the dropdown box.
Salesperson
Select the salesperson linked to this proposal. This is a required field.
Delivery Method
Select how you would like to deliver this proposal from the dropdown box.
Brief Description
Enter a brief description of the proposal (250 words or less).
4. Proposal Items/Parts Tab
To add items/parts to a proposal, click on the respective tabs and complete the following steps. The same steps apply for parts and items:

a. Add Items
Click "Add items". An "Add Items" page will appear. Check the boxes to the left of the items you would like add to the proposal. If you would like to create a new item, select "Create Item" in the upper right corner, complete the fields in the "New Item" page that appears.and press save in the bottom right corner. When you are done adding items, click "Add Items" in the bottom right corner.
b. Edit Fields
Once you have added items, edit fields by clicking the space beneath each heading. You can edit all fields aside from "Item Code".
c. Sort
To sort the order you would like items to appear on the proposal, use the arrows to the left of the item you would like to move.
5. Proposal RMR Tab
Add RMR items to the proposal.
*Note: An RMR (recurring monthly revenue) at the proposal stage, is only used for viewable purposes. The RMR on the proposal will become active once the workorder has been completed.
6. Proposal Notes Tab
Add notes to a proposal. THESE NOTES WILL APPEAR ON THE PROPOSAL. Edit fields by clicking the space beneath each heading.
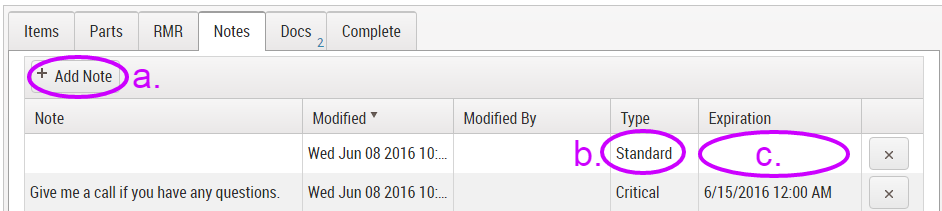
a. Add Note
Click Add Note on the left side of the page.
b. Type
Select note type from the dropdown box.
Standard
This is a standard note that will appear on the "proposal".
Critical
This is a note that will appear on the proposal and will also appear every time you open the "Proposal Page".
c. Expiration
"Expiration" only applies to critical notes. Select the date and time you would like the note to expire. The note will no longer appear every time you open this proposal after this date.
6. Proposal Docs
Upload documents and/or attachments you wish to link to the proposal.
*Note: Documents and Attachments can only be viewed when the proposal is sent via Email.

a. Upload Attachments
To upload attachment(s) (documents you have already added in the "Utilities" page in the setup table), click the "Add Attachments" button on the right side of the page, check the boxes to the right of the attachment(s) you would like to add, and click "Add" in the bottom right corner of the page.
*Note: You cannot edit "Description", "Type", or "Security" fields for attachments.
b. Upload Files
To upload a file from your documents to attach to this proposal, click "Upload Files" on the right side of the page. Select the file you would like to add and click the "Enter" key on your keyboard. Fill out fields for this document by clicking the space beneath each heading:
File Name
Edit the file name in the white box. If you wish to upload a new file to overwrite this document click the upload icon that appears in this field.
Description
enter a brief description of the document.
Type
Select the document type from the dropdown box.
c. Save Changes
Click "Save Changes" on the right side of the page to update.
d. Download Files
To download a file or attachment to your documents, click the download icon to the right of the file/attachment you wish to download.
This prospect can proceed in one of three ways with the proposal:
1. Open Proposal
If the prospect hasn't made a decision yet, or if you are not ready to turn an accepted proposal into a work order at this time Select "Pending", "Open", or "Accepted" in the "Status" field and press "Save" in the upper right corner:

*Note: Proposals with "Pending", "Open", or "Accepted" statuses will appear in the "Proposals" Tab in the "Customer Manager Page".
2. Closed Proposal
If the prospect rejects the proposal select "Rejected" or "Closed" in the "Status" field and press "Save" in the upper right corner:

*Note: Proposals with "Rejected", "Revised", "Closed", or "Sold" statuses will appear in the "Proposals" tab in the "Customer Manager Page" after checking the "Show Closed Proposals" box on the right side of the page.
3. Sold Proposal
a. Status
If the prospect accepts and you are ready to convert this proposal into a Work Order, select "Sold" from the status field:

b. Complete Tab
Fill out fields in the "Complete Tab":

Print Your Name
Enter customer's name (not required)
Draw Your Signature
Have the customer sign their name using their finger or mouse (not required).
Complete Proposal
Click "Complete Proposal" to convert this proposal into a work order.
c. Select Work Order Status and Type
Select "Work Order Status" and "Work Order Type" from the dropdown box. Click "Continue" in the bottom right corner:
 The"Proposal Page" will appear. The next article will discuss the "Proposal Page" for open, closed and sold proposals.
*Note: Because this proposal has turned into a Work Order, it can no longer be edited. If you need to make changes you will need to copy the "Sold" proposal, edit the copy (hyperlink to copying), resend to the customer, and generate a new work order. Please remember to VOID the previous work order if you do this.